mirror of
https://github.com/timerring/bilive.git
synced 2026-05-06 21:40:20 +08:00
380 lines
21 KiB
Markdown
380 lines
21 KiB
Markdown
<div align="center">
|
||
<picture>
|
||
<source media="(prefers-color-scheme: dark)" srcset="assets/headerDark.svg" />
|
||
<img src="assets/headerLight.svg" alt="BILIVE" />
|
||
</picture>
|
||
|
||
*7 x 24 小时无人监守录制、渲染弹幕、识别字幕、自动切片、自动上传、兼容超低配机器,启动项目,人人都是录播员。*
|
||
|
||
[:page_facing_up: Documentation](https://timerring.github.io/bilive/) |
|
||
[:gear: Installation](#quick-start) |
|
||
[:thinking: Reporting Issues](https://github.com/timerring/bilive/issues/new/choose)
|
||
|
||
支持模型
|
||
|
||
<div>
|
||
<img src="assets/openai.svg" alt="OpenAI whisper" width="60" height="60" />
|
||
<img src="assets/zhipu-color.svg" alt="Zhipu GLM-4V-PLUS" width="60" height="60" />
|
||
<img src="assets/gemini-brand-color.svg" alt="Google Gemini 1.5 Pro" width="60" height="60" />
|
||
<img src="assets/qwen-color.svg" alt="Qwen-2.5-72B-Instruct" width="60" height="60" />
|
||
</div>
|
||
|
||
<img src="assets/hunyuan-color.svg" alt="Tencent Hunyuan" width="50" height="60" />
|
||
<img src="assets/minimax-color.svg" alt="Minimax" width="20" height="60" />
|
||
<img src="assets/minimax-text.svg" alt="Minimax" width="60" height="60" />
|
||
<img src="assets/siliconcloud-color.svg" alt="SiliconFlow" width="15" height="60" />
|
||
<img src="assets/siliconcloud-text.svg" alt="SiliconFlow" width="100" height="60" />
|
||
<img src="assets/wenxin-color.svg" alt="Baidu ERNIE" width="60" height="60" />
|
||
<img src="assets/stability-brand-color.svg" alt="Stability AI" width="80" height="60" />
|
||
<img src="assets/luma-color.svg" alt="Luma Photon" width="20" height="60" />
|
||
<img src="assets/luma-text.svg" alt="Luma Photon" width="60" height="60" />
|
||
<img src="assets/ideogram.svg" alt="Ideogram V_2" width="50" height="60" />
|
||
<img src="assets/recraft.svg" alt="Recraft" width="50" height="60" />
|
||
<img src="assets/aws-color.svg" alt="Amazon" width="50" height="60" />
|
||
</div>
|
||
|
||
## 1. Introduction
|
||
|
||
> 如果您觉得项目不错,欢迎 :star: 也欢迎 PR 合作,如果有任何疑问,欢迎提 issue 交流。
|
||
|
||
自动监听并录制B站直播和弹幕(含付费留言、礼物等),根据分辨率转换弹幕、语音识别字幕并渲染进视频,根据弹幕密度切分精彩片段并通过视频理解大模型生成有趣的标题,自动投稿视频和切片至B站,兼容无GPU版本,兼容超低配置服务器与主机。
|
||
|
||
## 2. Major features
|
||
|
||
- **速度快**:采用 `pipeline` 流水线处理视频,理想情况下录播与直播相差半小时以内,没下播就能上线录播,**目前已知 b 站录播最快版本**!
|
||
- **多房间**:同时录制多个直播间内容视频以及弹幕文件(包含普通弹幕,付费弹幕以及礼物上舰等信息)。
|
||
- **占用小**:自动删除本地已上传的视频,极致节省空间。
|
||
- **模版化**:无需复杂配置,开箱即用,通过 b 站搜索建议接口自动抓取相关热门标签。
|
||
- **检测片段并合并**:对于网络问题或者直播连线导致的视频流分段,能够自动检测合并成为完整视频。
|
||
- **自动渲染弹幕**:自动转换xml为ass弹幕文件,该转换工具库已经开源 [DanmakuConvert](https://github.com/timerring/DanmakuConvert) 并且渲染到视频中形成**有弹幕版视频**并自动上传。
|
||
- **硬件要求极低**:无需GPU,只需最基础的单核CPU搭配最低的运存即可完成录制,弹幕渲染,上传等等全部过程,无最低配置要求,10年前的电脑或服务器依然可以使用!
|
||
- **( :tada: NEW)自动渲染字幕**:采用 OpenAI 的开源模型 `whisper`,自动识别视频内语音并转换为字幕渲染至视频中。
|
||
- **( :tada: NEW)自动切片上传**:根据弹幕密度计算寻找高能片段并切片,该自动切片工具库已开源 [auto-slice-video](https://github.com/timerring/auto-slice-video),结合多模态视频理解大模型自动生成有意思的切片标题及内容,并且自动上传,目前已经支持的模型有:
|
||
- `GLM-4V-PLUS`
|
||
- `Gemini-2.0-flash`
|
||
- `Qwen-2.5-72B-Instruct`
|
||
- **( :tada: NEW)持久化登录/下载/上传视频(支持多p投稿)**:[bilitool](https://github.com/timerring/bilitool) 已经开源,实现持久化登录,下载视频及弹幕(含多p)/上传视频(可分p投稿),查询投稿状态,查询详细信息等功能,一键pip安装,可以使用命令行 cli 操作,也可以作为api调用。
|
||
- **( :tada: NEW)自动多平台循环直播推流**:该工具已经开源 [looplive](https://github.com/timerring/looplive) 是一个 7 x 24 小时全自动**循环多平台同时推流**直播工具。
|
||
- **( :tada: NEW)自动生成风格变换的视频封面**:采用图生图多模态模型,自动获取视频截图并上传风格变换后的视频封面。
|
||
- `Minimax image-01`
|
||
- `Kwai Kolors`
|
||
- `Tencent Hunyuan`
|
||
- `Baidu ERNIE irag-1.0`
|
||
- `Stable Diffusion 3.5 large turbo`
|
||
- `Luma Photon`
|
||
- `Ideogram V_2`
|
||
- `Recraft`
|
||
- `Amazon Titan Image Generator V2`
|
||
|
||
项目架构流程如下:
|
||
|
||
```mermaid
|
||
graph TD
|
||
User((用户))--record-->startRecord(启动录制)
|
||
startRecord(启动录制)--保存视频和字幕文件-->videoFolder[(Video 文件夹)]
|
||
|
||
User((用户))--scan-->startScan(启动扫描 Video 文件夹)
|
||
videoFolder[(Video 文件夹)]<--间隔两分钟扫描一次-->startScan(启动扫描 Video 文件夹)
|
||
startScan <--视频文件--> whisper[whisperASR模型]
|
||
whisper[whisperASR模型] --生成字幕-->parameter[查询视频分辨率]
|
||
subgraph 启动新进程
|
||
parameter[查询分辨率] -->ifDanmaku{判断}
|
||
ifDanmaku -->|有弹幕| DanmakuConvert[DanmakuConvert]
|
||
ifDanmaku -->|无弹幕| ffmpeg1[ffmpeg]
|
||
DanmakuConvert[DanmakuConvert] --根据分辨率转换弹幕--> ffmpeg1[ffmpeg]
|
||
ffmpeg1[ffmpeg] --渲染弹幕及字幕 --> Video[视频文件]
|
||
Video[视频文件] --计算弹幕密度并切片--> GLM[多模态视频理解模型]
|
||
GLM[多模态视频理解模型] --生成切片信息--> slice[视频切片]
|
||
end
|
||
|
||
slice[视频切片] --> uploadQueue[(上传队列)]
|
||
Video[视频文件] --> uploadQueue[(上传队列)]
|
||
|
||
User((用户))--upload-->startUpload(启动视频上传进程)
|
||
startUpload(启动视频上传进程) <--扫描队列并上传视频--> uploadQueue[(上传队列)]
|
||
```
|
||
|
||
|
||
## 3. 测试硬件
|
||
+ OS: Ubuntu 22.04.4 LTS
|
||
+ 架构: x64
|
||
+ CPU:2核 Intel(R) Xeon(R) Platinum 85
|
||
+ GPU:无
|
||
+ 内存:2G
|
||
+ 硬盘:40G
|
||
+ 带宽: 3Mbps
|
||
+ Python 版本: 3.10
|
||
> 个人经验:若想尽可能快地更新视频,主要取决于上传速度而非弹幕渲染速度,因此建议网络带宽越大越好。
|
||
|
||
+ OS: debian 6.1.0-32
|
||
+ 架构: aarch64
|
||
+ CPU: 1核 Neoverse-N1
|
||
+ GPU: 无
|
||
+ 内存: 4G
|
||
+ 硬盘: 30G
|
||
+ 带宽: 100Mbps
|
||
+ Python 版本: 3.10
|
||
|
||
|
||
## 4. Quick start
|
||
|
||
更详细的教程请参考文档 [bilive](https://timerring.github.io/bilive/)
|
||
|
||
> [!NOTE]
|
||
> 如果你是 windows 用户,请使用 WSL 运行本项目。
|
||
|
||
### Mode
|
||
首先介绍本项目三种不同的处理模式:(以下特指 asr_method="deploy" 的情况,如填"none"或者"api"则不涉及 GPU, 可以忽略对 GPU 的描述)
|
||
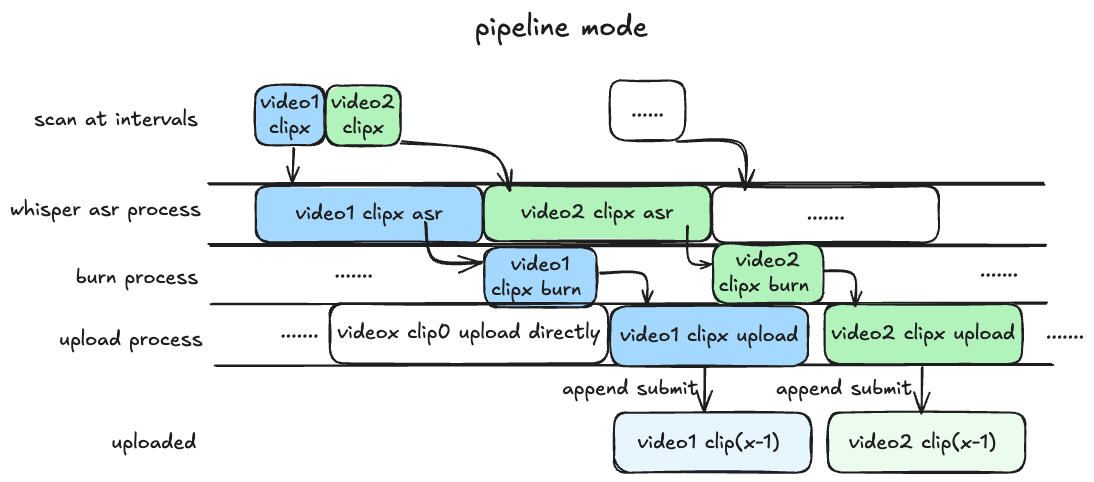
1. `pipeline` 模式(默认): 目前最快的模式,需要 GPU 支持,最好在 `blrec` 设置片段为半小时以内,asr 识别和渲染并行执行,分 p 上传视频片段。
|
||
|
||
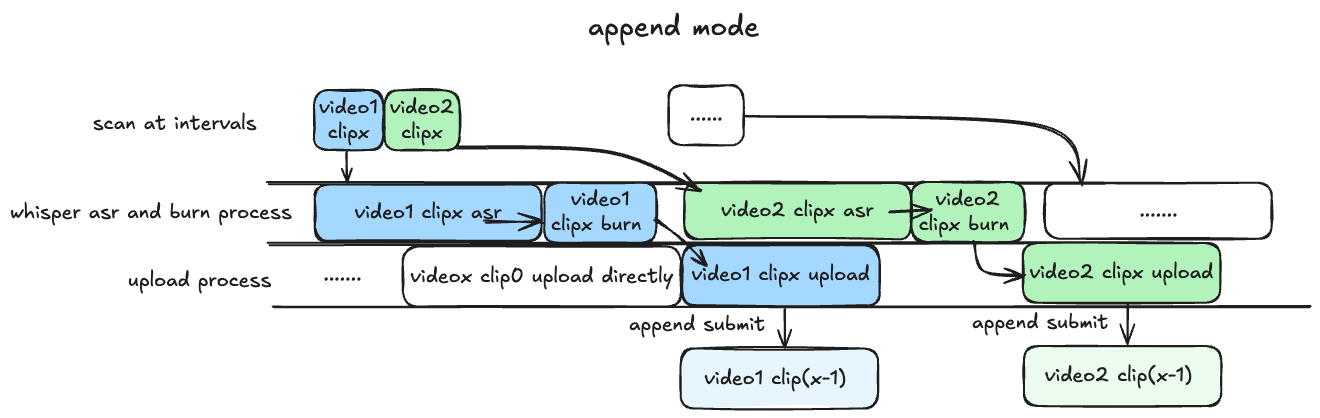
2. `append` 模式: 基本同上,但 asr 识别与渲染过程串行执行,比 pipeline 慢预计 25% 左右,对 GPU 显存要求较低,兼顾硬件性能与处理上传效率。
|
||
|
||
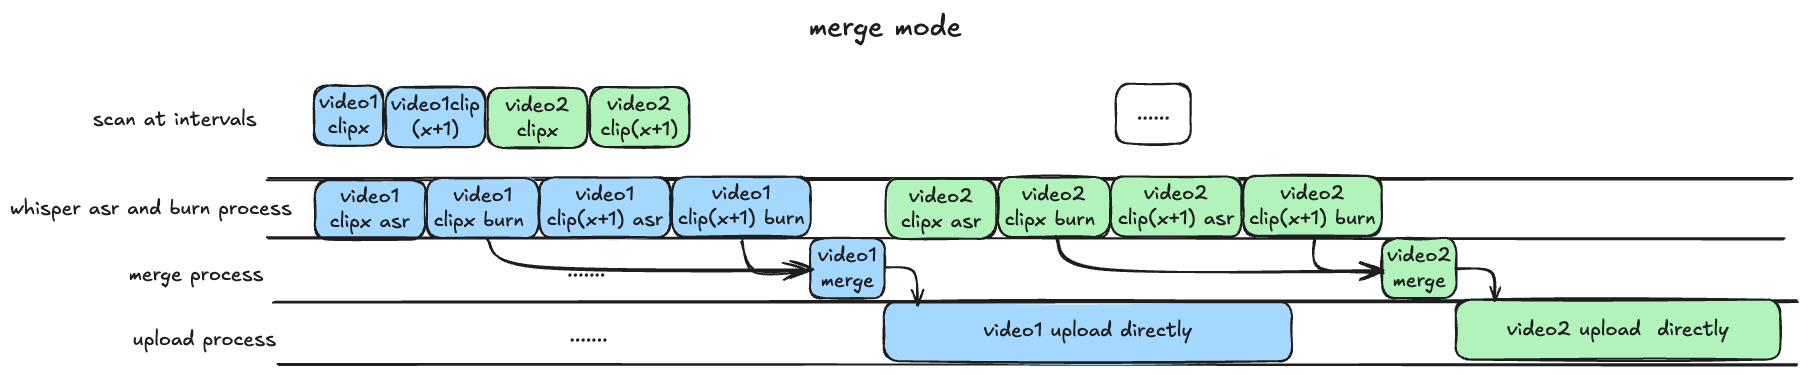
3. `merge` 模式: 等待所有录制完成,再进行识别渲染合并过程,上传均为完整版录播(非分 P 投稿),等待时间较长,效率较慢,适合需要上传完整录播的场景。
|
||
|
||
|
||
> [!IMPORTANT]
|
||
> 凡是用到 GPU 均需保证 GPU 显存大于运行程序所需 VRAM,具体计算 VRAM 方法可以参考[该部分](https://timerring.github.io/bilive/models.html#计算-vram-需求)。
|
||
|
||
### Installation
|
||
|
||
> [!TIP]
|
||
> 如果你是 windows 用户,请使用 WSL 运行本项目。
|
||
|
||
#### 0. clone 项目
|
||
|
||
由于项目引入了我写的 submodule [DanmakuConvert](https://github.com/timerring/DanmakuConvert),[bilitool](https://github.com/timerring/bilitool) 和 [auto-slice-video](https://github.com/timerring/auto-slice-video),因此推荐 clone 项目时就更新 submodules。
|
||
|
||
```bash
|
||
git clone --recurse-submodules https://github.com/timerring/bilive.git
|
||
```
|
||
|
||
如果你没有采用上述方式 clone 项目,请更新 submodules:
|
||
|
||
```bash
|
||
git submodule update --init --recursive
|
||
```
|
||
|
||
#### 1. 安装依赖(推荐创建虚拟环境)
|
||
|
||
```
|
||
cd bilive
|
||
pip install -r requirements.txt
|
||
```
|
||
|
||
此外请根据各自的系统类型安装对应的 [`ffmpeg`](https://www.ffmpeg.org/download.html),例如 [ubuntu 安装 ffmpeg](https://gcore.com/learning/how-to-install-ffmpeg-on-ubuntu/)。
|
||
|
||
[常见问题收集](https://timerring.github.io/bilive/install-questions.html)
|
||
|
||
#### 2. 配置参数
|
||
|
||
##### 2.1 whisper 语音识别(渲染字幕功能)
|
||
|
||
> [!TIP]
|
||
> - 有关语音识别的配置在 `bilive.toml` 文件的 `[asr]` 部分。
|
||
> - `asr_method` 默认为 none, 即不进行语音字幕识别。
|
||
|
||
##### 2.1.1 采用 api 方式
|
||
|
||
将 `bilive.toml` 文件中的 `asr_method` 参数设置为 `api`,然后填写 `WHISPER_API_KEY` 参数为你的 [API Key](https://console.groq.com/keys)。
|
||
|
||
本项目采用 groq 提供 free tier 的 `whisper-large-v3-turbo` 模型,上传限制为 40 MB(约半小时),因此如需采用 api 识别的方式,请将视频录制分段调整为 30 分钟(默认即 30 分钟)。此外,free tier 请求限制为 7200秒/20次/小时,28800秒/2000次/天。如果有更多需求,也欢迎升级到 dev tier,更多信息见[groq 官网](https://console.groq.com/docs/rate-limits)。
|
||
|
||
##### 2.1.2 采用本地部署方式(需保证有 NVIDIA 显卡)
|
||
|
||
将 `bilive.toml` 文件中的 `asr_method` 参数设置为 `deploy`,然后下载所需模型文件,并放置在 `src/subtitle/models` 文件夹中。
|
||
|
||
项目默认采用 [`small`](https://openaipublic.azureedge.net/main/whisper/models/9ecf779972d90ba49c06d968637d720dd632c55bbf19d441fb42bf17a411e794/small.pt) 模型,请点击下载所需文件,并放置在 `src/subtitle/models` 文件夹中。
|
||
|
||
> [!TIP]
|
||
> + 请保证 NVIDIA 显卡驱动安装正确 `nvidia-smi` `nvcc -V`,并能够调用 CUDA 核心 `print(torch.cuda.is_available())` 返回 `True`。如果未配置显卡驱动或未安装 `CUDA`,即使有 GPU 也无法使用,而会使用 CPU 推理,非常消耗 CPU 计算资源,不推荐,如果 CPU 硬件条件好可以尝试。
|
||
> + 使用该参数模型至少需要保证有显存大于 2.7GB 的 GPU,否则请使用其他参数量的模型。
|
||
> + 更多模型请参考 [whisper 参数模型](https://timerring.github.io/bilive/models.html) 部分。
|
||
> + 更换模型方法请参考 [更换模型方法](https://timerring.github.io/bilive/models.html#更换模型方法) 部分。
|
||
|
||
##### 2.2 MLLM 模型(自动切片功能)
|
||
|
||
> [!TIP]
|
||
> - 有关自动切片的配置在 `bilive.toml` 文件的 `[slice]` 部分。
|
||
> - `auto_slice` 默认为 false, 即不进行自动切片。
|
||
|
||
MLLM 模型主要用于自动切片后的切片标题生成,此功能默认关闭,如果需要打开请将 `auto_slice` 参数设置为 `true`。其他配置分别有:
|
||
- `slice_duration` 以秒为单位设置切片时长(不建议超过 180 秒)。
|
||
- `slice_num` 设置切片数量。
|
||
- `slice_overlap` 设置切片重叠时长。切片采用滑动窗口法处理,细节内容请见 [auto-slice-video](https://github.com/timerring/auto-slice-video)
|
||
- `slice_step` 设置切片步长。
|
||
- `min_video_size` 设置最小被切片视频大小,防止对一些连线或者网络波动原因造成的短片段再切片。
|
||
|
||
接下来配置模型有关的 `mllm_model` 参数即对应的 api-key,请自行根据链接注册账号并且申请对应 api key,填写在对应的参数中,请注意以下模型只有你在 `mllm_model` 参数中设置的那个模型会生效。
|
||
|
||
| Company | Google | 智谱 | 阿里云 |
|
||
|----------------|-------------------|------------------|-----------------------|
|
||
| Name | Gemini-2.0-flash | GLM-4V-PLUS | Qwen-2.5-72B-Instruct |
|
||
| `mllm_model` | `gemini`| `zhipu` | `qwen` |
|
||
| `API key` | [gemini_api_key](https://aistudio.google.com/app/apikey) | [zhipu_api_key](https://www.bigmodel.cn/invite?icode=shBtZUfNE6FfdMH1R6NybGczbXFgPRGIalpycrEwJ28%3D) | [qwen_api_key](https://bailian.console.aliyun.com/?apiKey=1) |
|
||
|
||
|
||
#### 2.3 Image Generation Model(自动生成视频封面)
|
||
|
||
> [!TIP]
|
||
> - 有关自动生成视频封面的配置在 `bilive.toml` 文件的 `[cover]` 部分。
|
||
> - `generate_cover` 默认为 false, 即不进行自动生成视频封面。
|
||
|
||
采用图生图多模态模型,自动获取视频截图并上传风格变换后的视频封面,如需使用本功能,请将 `generate_cover` 参数设置为 `true`。接下来需要配置的参数有 image_gen_model 和对应的 api key,请自行根据链接注册账号并且申请对应 api key,填写在对应的参数中,请注意以下模型只有你在 `image_gen_model` 参数中设置的那个模型会生效。
|
||
|
||
|
||
| Company | Model Name | `image_gen_model` | `API Key` |
|
||
|--------------|--------------------------------|-------------------|---------------------------------------------------------------------------------|
|
||
| Minimax | image-01 | `minimax` | [minimax_api_key](https://www.minimax.chat/) |
|
||
| Kwai | Kolors | `siliconflow` | [siliconflow_api_key](https://cloud.siliconflow.cn/i/3Szr5BVg) |
|
||
| Tencent | Hunyuan | `tencent` | [tencent_secret_id and tencent_secret_key](https://console.cloud.tencent.com/cam/capi) |
|
||
| Baidu | ERNIE irag-1.0 | `baidu` | [baidu_api_key](https://console.bce.baidu.com/iam/key/list) |
|
||
| Stability AI | Stable Diffusion 3.5 large turbo | `stability` | [stability_api_key](https://platform.stability.ai/account/keys) |
|
||
| Luma Labs | Photon | `luma` | [luma_api_key](https://lumalabs.ai/api/keys) |
|
||
| Ideogram | Ideogram V_2 | `ideogram` | [ideogram_api_key](https://ideogram.ai/manage-api) |
|
||
| Recraft | Recraft V3 | `recraft` | [recraft_api_key](https://www.recraft.ai/profile/api) |
|
||
| Amazon | Titan Image Generator V2 | `amazon` | [aws_access_key_id and aws_secret_access_key](https://aws.amazon.com/console/) |
|
||
|
||
#### 3. 配置上传参数
|
||
|
||
上传默认参数如下,[]中内容全部自动替换。可以在 `bilive.toml` 中自定义相关配置,映射关键词为 `{artist}`、`{date}`、`{title}`、`{source_link}`,可自行组合删减定制模板:
|
||
|
||
- `title` 标题模板是`{artist}直播回放-{date}-{title}`,效果为"【弹幕+字幕】[XXX]直播回放-[日期]-[直播间标题]",可自行修改。
|
||
- `description` 简介模板是`{artist}直播,直播间地址:{source_link} 内容仅供娱乐,直播中主播的言论、观点和行为均由主播本人负责,不代表录播员的观点或立场。`,效果为"【弹幕+字幕】[XXX]直播,直播间地址:[https://live.bilibili.com/XXX] 内容仅供娱乐,直播中主播的言论、观点和行为均由主播本人负责,不代表录播员的观点或立场。",可自行修改。
|
||
- `gift_price_filter = 1` 表示过滤价格低于 1 元的礼物。
|
||
- `reserve_for_fixing = false` 表示如果视频出现错误,重试失败后不保留视频用于修复,推荐硬盘空间有限的用户设置 false。
|
||
- `upload_line = "auto"` 表示自动探测上传线路并上传,如果需要指定固定的线路,可以设置为 `bldsa`、`ws`、`tx`、`qn`、`bda2`。
|
||
|
||
#### 4. 配置录制参数
|
||
|
||
> [!IMPORTANT]
|
||
> 请不要修改任何有关路径的任何配置,否则会导致上传模块不可用
|
||
|
||
> 录制模块采用第三方 package `blrec`,参数配置在 `settings.toml` 文件,也可以直接在录制启动后在对应的端口可视化页面配置。Quick start 只介绍关键配置,其他配置可自行在页面中对照配置项理解,支持热修改。
|
||
|
||
- 房间的添加按照文件中 `[[tasks]]` 对应的格式即可。
|
||
- 录制模块不登录状态下默认的录制质量为超清。如果需要登录,请将 cookie.json 文件(获取方式见步骤 5)中的 `SESSDATA` 参数值填写到 `[header]` 的 cookie 部分,形式`cookie = "SESSDATA=XXXXXXXXXXX"`,登录后即可录制更高质量画质。(推荐不登录)
|
||
- `duration_limit` 表示录制时长,如果采用 whisper api 识别语音,请将分段控制在 1800 秒以内,其他情况没有限制。
|
||
|
||
#### 5. bilitool 登录(持久化登录,该步只需执行一次)
|
||
|
||
> 对于 docker 部署,可以忽略这一步,因为 `docker logs` 在控制台中可以打印出二维码,直接扫码即可登录,以下内容针对源码部署。
|
||
|
||
##### 5.1 方式一 通过 cookie 登录
|
||
一般日志文件打印不出二维码效果,所以这步需要提前在机器上安装 [bilitool](https://github.com/timerring/bilitool):
|
||
|
||
```
|
||
pip install bilitool
|
||
bilitool login --export
|
||
# 然后使用 app 端扫码登录,会自动导出 cookie.json 文件
|
||
```
|
||
将登录的 cookie.json 文件留在本项目根目录下,`./upload.sh` 启动后即可删除该文件。
|
||
|
||
##### 5.2 方式二 通过 submodule 登录
|
||
|
||
或者在 submodule 中登录也可以,方式如下:
|
||
|
||
```
|
||
cd src/upload/bilitool
|
||
python -m bilitool.cli login
|
||
# 然后使用 app 端扫码即可登录
|
||
```
|
||
|
||
[常见问题收集](https://timerring.github.io/bilive/biliup.html)
|
||
|
||
#### 6. 启动自动录制
|
||
|
||
默认密码为 `bilive2233`, 如果要将录制页面向公网开放,请务必在 `record.sh` 的 `--api-key` 后重新设置密码!如需使用 https,可以考虑 openssl 自签名证书并添加参数 `--key-file path/to/key-file --cert-file path/to/cert-file`。
|
||
|
||
```bash
|
||
./record.sh
|
||
```
|
||
|
||
[常见问题收集](https://timerring.github.io/bilive/record.html)
|
||
|
||
#### 7. 启动自动上传
|
||
|
||
> 如果你使用 deploy 的方式进行语音识别,请先确保你已经正确下载并放置了对应的模型文件。
|
||
|
||
```bash
|
||
./upload.sh
|
||
```
|
||
|
||
[常见问题收集](https://timerring.github.io/bilive/upload.html)
|
||
|
||
#### 日志信息
|
||
|
||
相应的执行日志请在 `logs` 文件夹中查看,如果有问题欢迎在 [`issue`](https://github.com/timerring/bilive/issues/new/choose) 中提出,有异常请优先提供 [debug] 级别的日志。
|
||
|
||
```
|
||
logs # 日志文件夹
|
||
├── blrec # blrec 录制日志
|
||
│ └── ...
|
||
├── scan # scan 处理日志 [debug]级别
|
||
│ └── ...
|
||
├── upload # upload 上传日志 [debug]级别
|
||
│ └── ...
|
||
└── runtime # 每次执行的日志 [info]级别
|
||
└── ...
|
||
```
|
||
|
||
### Docker 运行
|
||
|
||
也可以直接拉取 docker 镜像运行,默认 latest。守护进程是 upload,而 record 以及 scan 需要在配置后手动启动,相关配置以及启动流程从 3.2 开始即可。
|
||
|
||
> [!IMPORTANT]
|
||
> 如果不需要使用可视化页面可以忽略以下提醒:
|
||
> - 不推荐在有公网 ip 的服务器上直接暴露 22333 端口访问管理页面,如果使用请自行限制端口入站 ip 规则或者采用 nginx 等反向代理配置密钥限制他人访问。
|
||
> - 管理页面主要针对 record 模块,只有手动运行 record 后(步骤5)才能访问到管理页面。
|
||
|
||
#### 无 GPU 版本
|
||
|
||
如果你能看到这行字,说明 0.3.0 版本还没有发布,会在两天内测试完发布,请耐心等待。可以尝试源码部署。
|
||
|
||
```bash
|
||
sudo docker run \
|
||
-itd \
|
||
--name bilive_docker \
|
||
-p 22333:2233 \
|
||
ghcr.io/timerring/bilive:0.3.0
|
||
```
|
||
|
||
#### 有 GPU 版本
|
||
|
||
如果你能看到这行字,说明 0.3.0 版本还没有发布,会在两天内测试完发布,请耐心等待。可以尝试源码部署。
|
||
|
||
```bash
|
||
sudo docker run \
|
||
-itd \
|
||
--gpus 'all,"capabilities=compute,utility,video"' \
|
||
--name bilive_docker_gpu \
|
||
-p 22333:2233 \
|
||
ghcr.io/timerring/bilive-gpu:0.3.0
|
||
```
|
||
|
||
### Docker Compose
|
||
|
||
`compose.yml` 调整方法见 [Installation](https://bilive.timerring.com/installation.html)。
|
||
|
||
#### 使用镜像
|
||
|
||
默认 CPU latest version,如需使用 GPU 版本,请自行在 `compose.yml` 中调整。
|
||
|
||
```bash
|
||
docker compose up -d
|
||
```
|
||
|
||
#### 自行构建
|
||
|
||
请先在 `compose.yml` 中调整相关配置,然后执行以下命令:
|
||
|
||
```bash
|
||
docker build
|
||
docker compose up -d
|
||
```
|
||
|
||
## 特别感谢
|
||
|
||
- [acgnhiki/blrec](https://github.com/acgnhiki/blrec)
|
||
- [OpenAI/whisper](https://github.com/OpenAI/whisper)
|
||
- [biliup/biliup-rs](https://github.com/biliup/biliup-rs)
|
||
- [hihkm/DanmakuFactory](https://github.com/hihkm/DanmakuFactory) |